table of contents
TallyPrime is a popular accounting software that is widely used by businesses to manage their finances. It is a user-friendly and powerful software that simplifies the accounting process and provides businesses with accurate financial information. Creating a company in TallyPrime is a straightforward process, and this blog post will guide you through the steps.
Step 1: Open TallyPrime
The first step to creating a company in TallyPrime is to open the software. Once you have opened the software, you will see the gateway of TallyPrime.
Step 2: Select the Create Company Option
 From the gateway of TallyPrime, select the Create Company option. You can do this by either clicking on the button or using the shortcut key Alt + F3.
Step 3: Fill in the Company Details
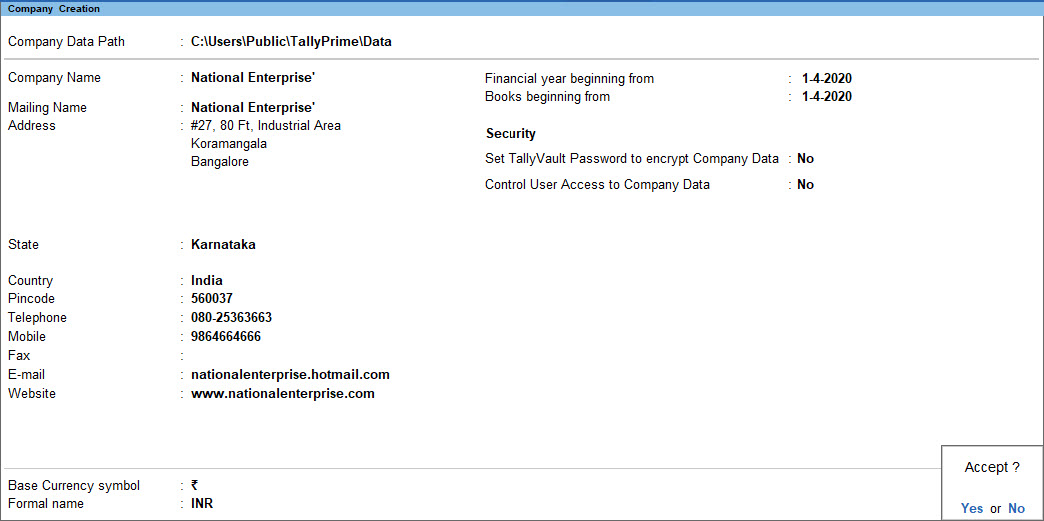
After selecting the Create Company option, you will be taken to the Create Company screen. Here, you will need to fill in the company details, such as the name, address, and contact information.
You will also need to select the appropriate country, state, and city. This information is essential as it helps TallyPrime determine the tax laws and regulations that apply to your company.
Step 4: Select the Financial Year
Once you have filled in the company details, you will need to select the financial year. The financial year is the period during which your company’s financial transactions will be recorded. In India, the financial year starts on April 1st and ends on March 31st of the following year.
Step 5: Set the Base Currency
Next, you will need to set the base currency for your company. The base currency is the currency in which all your financial transactions will be recorded. It is important to select the correct base currency as it will affect how your financial reports are generated.
Step 6: Enable GST
 If you are operating your business in India, you will need to enable the Goods and Services Tax (GST) feature. GST is a comprehensive tax system that has replaced multiple indirect taxes in India. Enabling GST in TallyPrime will allow you to calculate and file your GST returns directly from the software.
Step 7: Set Security Controls
TallyPrime allows you to set security controls for your company. You can restrict access to certain features or data based on user roles. This is an important step as it helps you protect sensitive financial information.
Step 8: Create Ledgers
Once you have set up the company, you will need to create ledgers. Ledgers are accounts that record financial transactions. For example, you will need to create a ledger for your bank account, sales, and purchases.
To create a ledger, select the Accounts option from the gateway of TallyPrime, and then click on Ledgers. From here, you can create new ledgers by clicking on the Create button.
Step 9: Create Vouchers
Vouchers are records of financial transactions. You will need to create vouchers for each financial transaction that occurs in your company. For example, you will need to create a voucher for each sale or purchase.
To create a voucher, select the Accounting Vouchers option from the gateway of TallyPrime, and then click on the type of voucher you want to create. For example, if you want to create a sales voucher, click on Sales.
Step 10: Generate Reports
TallyPrime allows you to generate various financial reports, such as balance sheets, profit and loss statements, and cash flow statements. These reports provide you with valuable insights into your company’s financial health.
To generate a report, select the Reports option from the gateway of TallyPrime, and then click on the type of report you want to generate. For example, if you want to generate a balance sheet, click on Balance Sheet.
Tally Customisation Provider – RK Solutions
Contact Details
Arcot Rd, Director’s Colony, Kodambakkam,
Chennai, Tamil Nadu 600024
mani[at]tallysoftware.co.in
+91 97894 95540 / +91 97894 95541


